Close
Page 1 of 2 12 LastLast
Results 1 to 10 of 13
  1. #1
    QUITTER Irving's Avatar
    Join Date
    Nov 2008
    Location
    Denver, CO
    Posts
    46,527
    Blog Entries
    1

    Default 41 mm (1 5/8") socket DIY

    Off the top of my head, I can think of at least 7 stores within 2 miles of me that probably sell a 41 mm socket. I can get one off Amazon for under $25. But I wanted to make one instead. I didn't get all of the cool build pictures, especially the ones showing how terrible this looked while I was tacking it up. In the end it's not even close to "square" and the hole in the back isn't centered, but it works the way I intended in my head this morning when I had this idea.

    1/8" plate steel I have laying around.


    Cut into six sections about 2" long.


    I skipped sooo many pictures, like the two hexagon shapes I cut out to fill in the back.


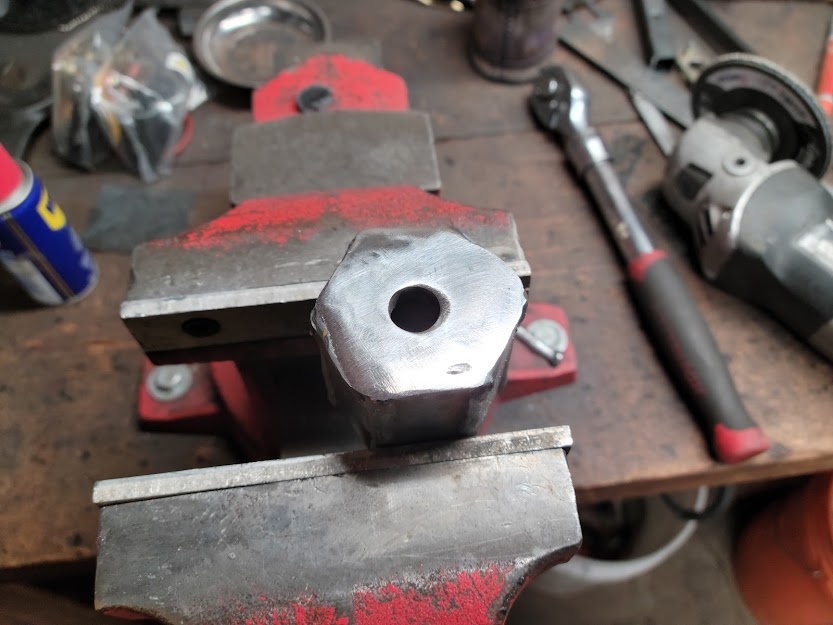
    I managed to get the mig gun down in there and get some decent beads. Not all of them turned out though. I had to figure it out. There are two identical-ish hexagons out of the same 1/8" plate in the back, welded on the inside and outside, as well as a bit on the sides as there was enough gap between the plates that everything got closed up together.


    I marked and drilled the hole before I cleaned up all the welds, so this probably would have been centered better had I made all my corners sharp first.


    I'm always amazed at how much stuff a grinder is able to hide.


    I chose a drill bit that was as large as the edges of the 1/2" drive to take out as much material as possible up front.


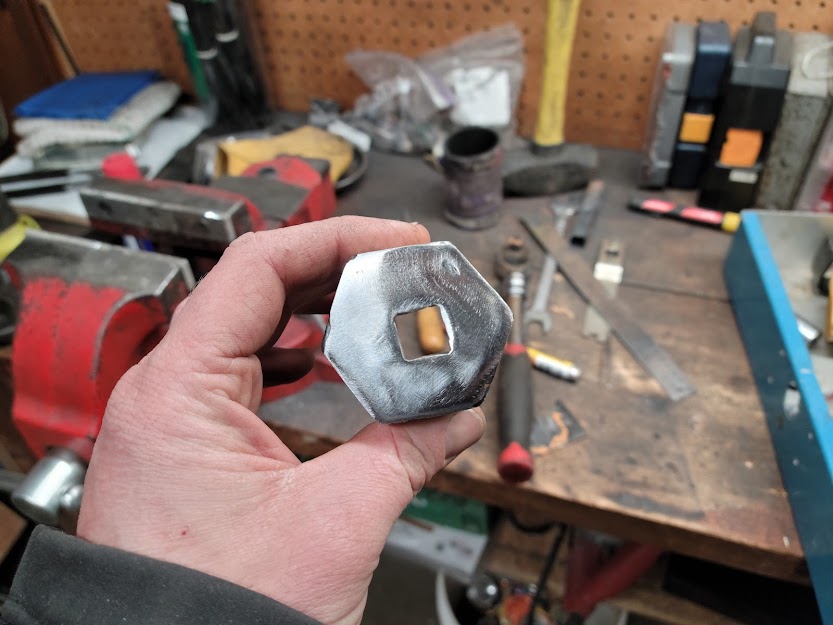
    I started to file the corners, but then realized I could stick my jigsaw with a metal blade in there and take out even more material to get me close.


    A bit difficult to see, but two 1/8" plates is the perfect amount to give clearance for the ball to lock in. You can see the ball on the top.


    Disappointingly out of center, and I didn't even try aligning the square sides to the hex sides. I have Harbor Freight impact drivers that aren't concentric, so I'm not too worried about it.


    Finally, had to clean up the inside with a file in the corners where the weld penetrated enough to cause interference.


    In my head I had planned to grind the size in a side or two. Heat the whole thing up to red hot, then drop it in a bucket of oil in an attempt to harden it. Then maybe blue it or something. Think that'd be a waste of time? I'd like to finish it off some way. I'll probably paint, "Made in USA" somewhere on there at some point as well.
    Last edited by Irving; 03-17-2021 at 22:12.

  2. #2
    QUITTER Irving's Avatar
    Join Date
    Nov 2008
    Location
    Denver, CO
    Posts
    46,527
    Blog Entries
    1

    Default

    I went to test out my new tool, and it wouldn't fit inside the hole. Turns out the other driveshaft flange nut is only a 36mm, and I already have one of those. Looks like I didn't need this at all. Oh well, lol.


  3. #3
    The "Godfather" of COAR Great-Kazoo's Avatar
    Join Date
    Sep 2003
    Location
    Washboard Alley, AZ.
    Posts
    48,074

    Default

    Needed or not. Knowing you can fab something up, is what counts. I would have done the hex in sections, with 2 tac welds on the outside of each 2 pc section. Then ran a bead on the inside of them, for a bit more strength
    The Great Kazoo's Feedback

    "when you're happy you enjoy the melody but, when you're broken you understand the lyrics".

  4. #4
    QUITTER Irving's Avatar
    Join Date
    Nov 2008
    Location
    Denver, CO
    Posts
    46,527
    Blog Entries
    1

    Default

    Do you mean the back plate hex in two sections? Otherwise, what you described was pretty much what I did with a tac on the top and back of each of the six sections I put together. I don't have the pictures, but I basically just lined everything up on that 41mm nut and held it together to tac together.

    By the way, I only found one YouTube video where a guy makes his own socket. It was one of those Russian videos and he used a CNC machine to do all the hard parts. There were ZERO DIY ammo can videos.

  5. #5
    Mr Yamaha brutal's Avatar
    Join Date
    Jul 2011
    Location
    Unincorporated Douglas County, CO
    Posts
    13,932

    Default

    Quote Originally Posted by Irving View Post
    There were ZERO DIY ammo can videos.
    My Feedback
    Credit TFOGGER : Liberals only want things to be "fair and just" if it benefits them.
    Credit Zundfolge: The left only supports two "rights"; Buggery and Infanticide.
    Credit roberth: List of things Government does best; 1. Steal your money 2. Steal your time 3. Waste the money they stole from you. 4. Waste your time making you ask permission for things you have a natural right to own. "Anyone that thinks the communists won't turn off your power for being on COAR15 is a fucking moron."

  6. #6
    The "Godfather" of COAR Great-Kazoo's Avatar
    Join Date
    Sep 2003
    Location
    Washboard Alley, AZ.
    Posts
    48,074

    Default

    Quote Originally Posted by Irving View Post
    Do you mean the back plate hex in two sections? Otherwise, what you described was pretty much what I did with a tac on the top and back of each of the six sections I put together. I don't have the pictures, but I basically just lined everything up on that 41mm nut and held it together to tac together.

    By the way, I only found one YouTube video where a guy makes his own socket. It was one of those Russian videos and he used a CNC machine to do all the hard parts. There were ZERO DIY ammo can videos.
    No i meant run a bead the entire length of the inner sections. You (for future reference) could have beveled the inside sections, to run a bead that would not affect the I.D, once completed. Giving it a little more strength, when needed to put some torque, on it
    But the best part of fabbing something is stepping back, and saying. Oh i could / should have done x , instead of this.

    Like the loc nut wrench i made for the dillon dies. Looked at some scrap i had, did a layout of the basics, then went to town.

    Instead of cutting the wrench flat on the bandsaw, then hand filing to fit. I said, afterward. Oh i could have done that wrench on the mill. Next time, maybe. Either way nice jon
    The Great Kazoo's Feedback

    "when you're happy you enjoy the melody but, when you're broken you understand the lyrics".

  7. #7
    QUITTER Irving's Avatar
    Join Date
    Nov 2008
    Location
    Denver, CO
    Posts
    46,527
    Blog Entries
    1

    Default

    Thank you sir. Now that I realize I'll probably never even use this socket, I'd like to torque it onto something just to see how it holds up. I'm sure I'll keep it forever now either way though. It will be right at home hanging out in the toolbox with all the tools my grandpa made.

  8. #8
    The "Godfather" of COAR Great-Kazoo's Avatar
    Join Date
    Sep 2003
    Location
    Washboard Alley, AZ.
    Posts
    48,074

    Default

    Quote Originally Posted by Irving View Post
    Thank you sir. Now that I realize I'll probably never even use this socket, I'd like to torque it onto something just to see how it holds up. I'm sure I'll keep it forever now either way though. It will be right at home hanging out in the toolbox with all the tools my grandpa made.
    He'd be proud of you following his footsteps. Did his house sell, or staying in the family?
    The Great Kazoo's Feedback

    "when you're happy you enjoy the melody but, when you're broken you understand the lyrics".

  9. #9
    QUITTER Irving's Avatar
    Join Date
    Nov 2008
    Location
    Denver, CO
    Posts
    46,527
    Blog Entries
    1

    Default

    Quote Originally Posted by Great-Kazoo View Post
    He'd be proud of you following his footsteps. Did his house sell, or staying in the family?
    One of my cousins bought it, but most of that big machinery is long gone now.

  10. #10
    Beer Meister DFBrews's Avatar
    Join Date
    Dec 2010
    Location
    With the classyish Hipsters...Stapleton
    Posts
    3,175

    Default

    Awesome project

    Mild steel doesn’t have enough carbon in it to harden when heated and quenched
    You sir, are a specialist in the art of discovering a welcoming outcome of a particular situation....not a mechanic.

    My feedback add 11-12 ish before the great servpocaylpse of 2012

Posting Permissions

  • You may not post new threads
  • You may not post replies
  • You may not post attachments
  • You may not edit your posts
  •