
I haven't had anything to add to this thread but I am anxiously waiting to see what you're making.

Colorado AR-15 Shooters Club Discussion Forums
Welcome to the Colorado AR-15 Shooters Club Discussion Forums.
Welcome to the Colorado AR-15 Shooters Club Discussion Forums.


I haven't had anything to add to this thread but I am anxiously waiting to see what you're making.
There's a fine line between cuddling and holding someone down so they can't get away.

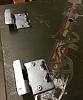
Does anyone know a LOCAL source where I can get an industrial cabinet hinge like this one:
https://www.thehardwarehut.com/catal...SACEgJtifD_BwE
Home Depot/Ace Hardware etc only have small ones. What I need is one where the measurement "A" is 3/4"
Would like to find local both for speed and so I will know that it is what I need.
Thanks!
Martin
If you love your freedom, thank a veteran. If you love to party, thank the Beastie Boys. They fought for that right.
I feel like I've seen those some where around town, but couldn't tell you where. Likely a Habitat for Humanity Restore or one of the similar places. That's a real crap shoot though, because it's not like they are regularly stocked.


Grainger.

Best thing to use is a die grinder with a carbide burr. Use it to lightly grind through each spot weld. Carbide will keep the heat down the best when going slowly. Only grind through each spot weld till you just barley get through to the parent metal. Then just lightly chisel or twist off the brace off. An angle grinder will work with either a closed stone wheel or flapper as others have mentioned. Those will just create too much heat. Just depends on what you are looking for a finished product. Any over heating in the thin sheet metal of an ammo can will result in shrinking or “oil canning” of the material. This will give the cleanest result.
Do they have a store? I thought they were mail order only.Originally Posted by buffalobo

EDIT: Never mind, found it.
EDIT#2: Grainger doesn't have that part listed. I'm going to go ahead and mail order it from the link above. I doubt I can find them any cheaper here and while I hate to wait, I hate driving all over town to look for something even more. I have time on this project.
Last edited by Martinjmpr; 01-26-2020 at 21:48.
Martin
If you love your freedom, thank a veteran. If you love to party, thank the Beastie Boys. They fought for that right.

McGuckins in Boulder?
Any updates? New pictures?
Next piece comes in the mail tomorrow (the hinge I pictured above.) Probably the next update will be this weekend.
Martin
If you love your freedom, thank a veteran. If you love to party, thank the Beastie Boys. They fought for that right.
THE BIG REVEAL!
OK, here it is. I was using the ammo cans to make hard sided panniers (side cases) for my motorcycle, a 2002 Triumph Bonneville.
I'd been wanting to add "hard luggage" for a while but I didn't like the options that were available to me. They were either too expensive or I just didn't like the look.
So, I ordered a set of Happy Trail side racks (Happy Trail in Idaho is a company that makes accessories for "Adventure Bikes" like the BMW GS, V-Strom, KLR, etc.) The racks looked good and stout in the photos and that's what I needed.
I ordered the rack last June and it sat in my garage while I did other things. But eventually, I got around to putting the rack on the bike and it was rock solid:
Next step was to figure out which boxes to use. I ultimately went with the 20mm ammo can size, which is honestly a tad large for what I need. I may "downsize" later. Nice thing about this mod is that the ammo can is about the cheapest part of the whole thing!
Ground off the reinforcing strap so I could put the lower mounts on (picture posted above.) Next I had to figure out the lower brackets. I can't take credit for the idea to use an industrial cabinet hinge, that came from a guy on ADVRider. But I mail ordered the hinges (since I couldn't find any locally.) Ordered on Monday they arrived Thursday. Put them in the vice and cut the rotating hinge off to use the S shaped bracket:
Next I removed one of the side racks so I could fit it more easily to the can. I "mocked up" like this so I could drill the holes for the mounting screws:
After I had the lower brackets bolted in, I drilled the holes for the upper mount. The rack comes with an M8 threaded captive nut so all I had to do was buy a plastic knob with an M8 threaded bolt to go from the inside to the outside:
It bolts through from the inside. As you can see I used two different styles of knobs because that was all that was available at the local ACE hardware:
The reason it screws in from the inside is that once I get locks on the cans, you will not be able to remove them without getting inside the can.
After that, since I had two holes left over on the lower bracket, I went ahead and drilled holes and riveted it in, since this is what bears most of the weight:
Martin
If you love your freedom, thank a veteran. If you love to party, thank the Beastie Boys. They fought for that right.
 Posting Permissions


 Reply With Quote